- CLIENTI: Bullaki
- PRODUCER: Samuele Lilliu
- SOFTWARE: Hugo, HTML
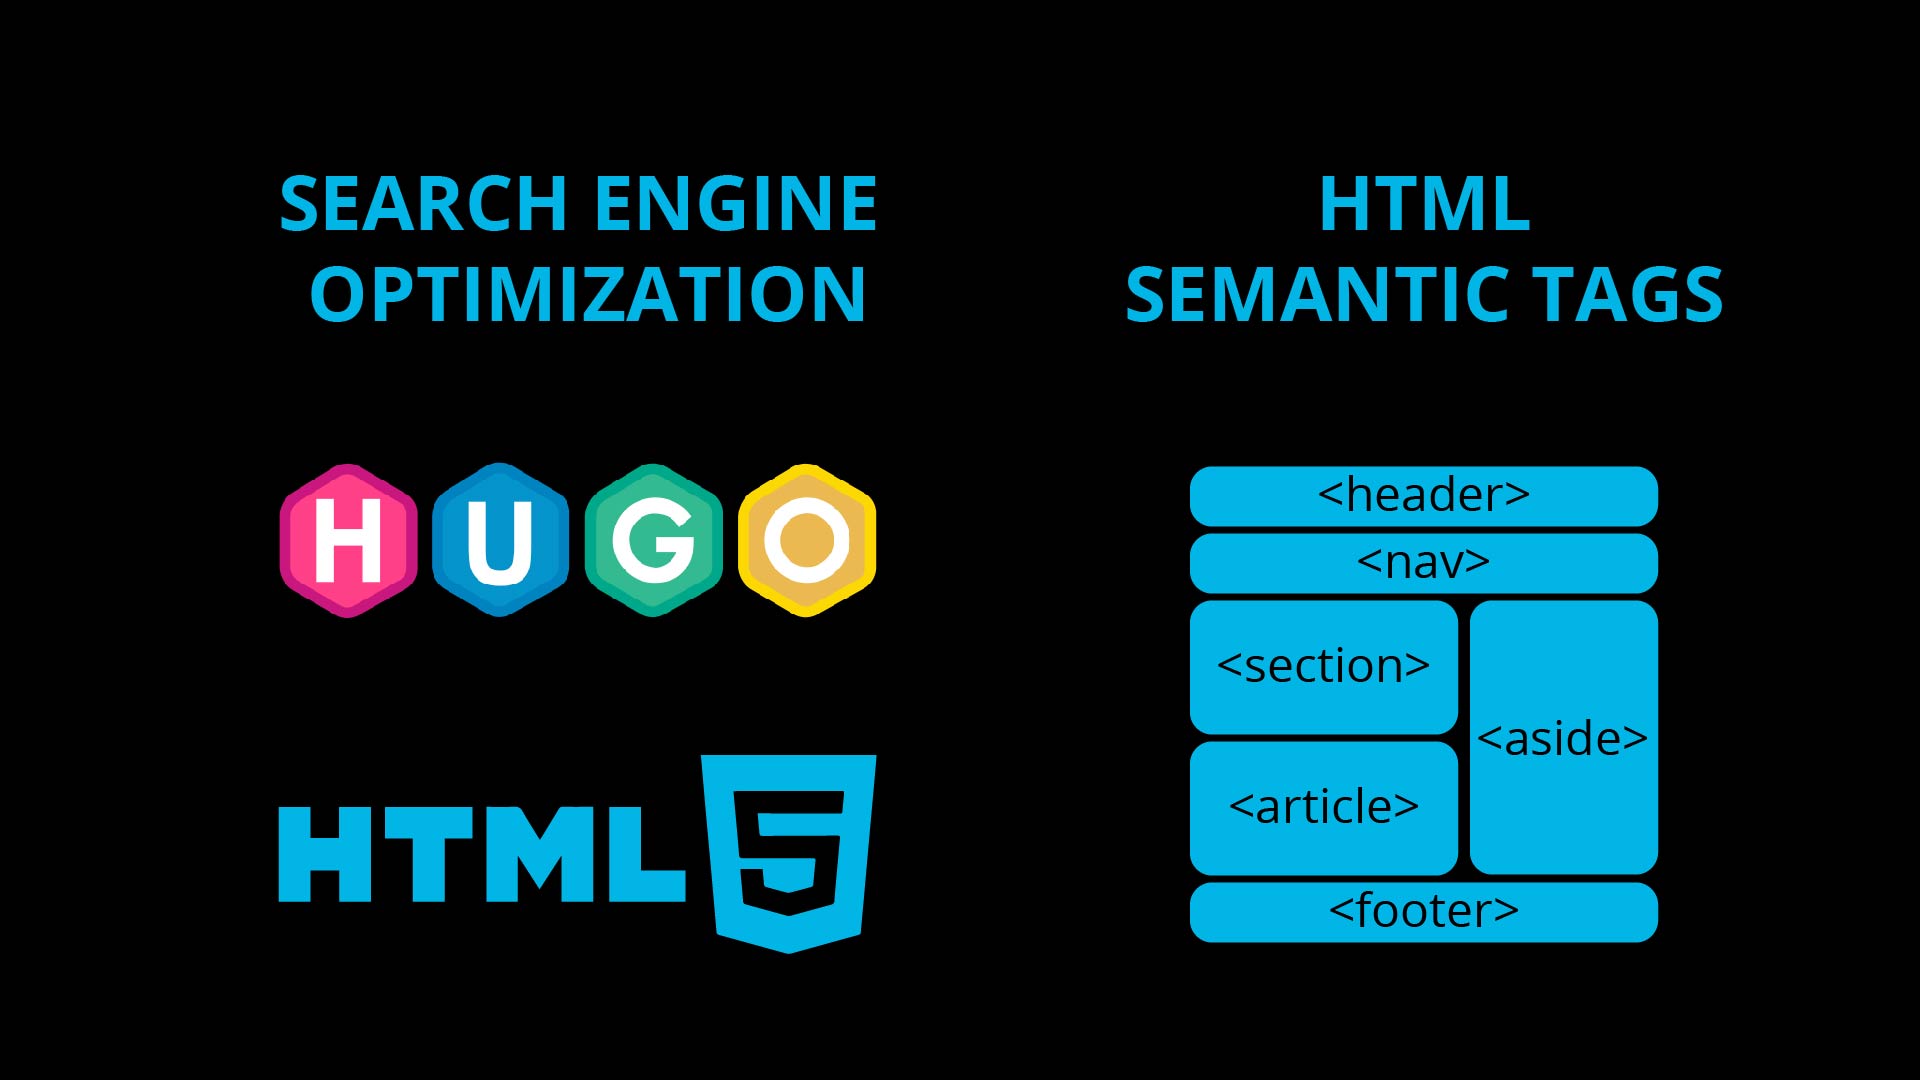
HTML semantic tags are HTML tags that are used to define the meaning or purpose of the content they contain. They provide additional information about the structure and meaning of the content on a web page, which can be used by browsers, search engines, and other technologies to understand and process the page more effectively.
HTML5 introduced a number of new semantic tags that can be used to improve the structure and meaning of the content on a web page. Here is a list of some of the most commonly used HTML5 semantic tags, along with a brief explanation of their purpose:
<header>: defines the header section of a web page, which typically contains the site title, main navigation, and other site-wide information.<nav>: defines a section of the page that contains navigation links. This can include links to other pages on the site, or to specific sections within the current page.<main>: defines the main content of the document. The main content should be unique to the document and exclude content that is repeated across a set of documents such as site headers, navigation, footers etc.<article>: defines a self-contained piece of content, such as a blog post or news story. This can include text, images, and other media, and can be styled and manipulated as a single unit.<section>: defines a distinct section of the page, such as a chapter or group of related content. This can be used to organize content into logical sections, and can be used to apply styles and other formatting to specific sections of the page.<aside>: defines content that is related to the main content, such as sidebar information or pull quotes. This can include text, images, and other media, and can be styled and manipulated as a single unit.<figure>: defines a section of the page that contains a self-contained piece of content, such as an image or a video. It can also include a caption<figcaption>: defines a caption for the content within a<figure>element.<footer>: defines the footer section of a web page, which typically contains copyright information and additional links.<time>: defines a date and/or time. It can include a datetime attribute which provides a machine-readable version of the date and/or time.<mark>: defines text that is highlighted for reference purposes, such as keywords in a document.<details>: defines additional details that the user can view or hide. It can be used in combination with<summary>to provide a summary of the details.<dialog>: defines a dialog box or window.<figure>: defines a container for a piece of self-contained flow content, commonly used for illustrations, diagrams, photos, code listings etc.
Using these semantic tags can improve the accessibility and SEO of web pages, by making it easier for browsers, search engines, and other technologies to understand and process the page more effectively.
You can find more information on sematic tags at W3 School semantic tags.
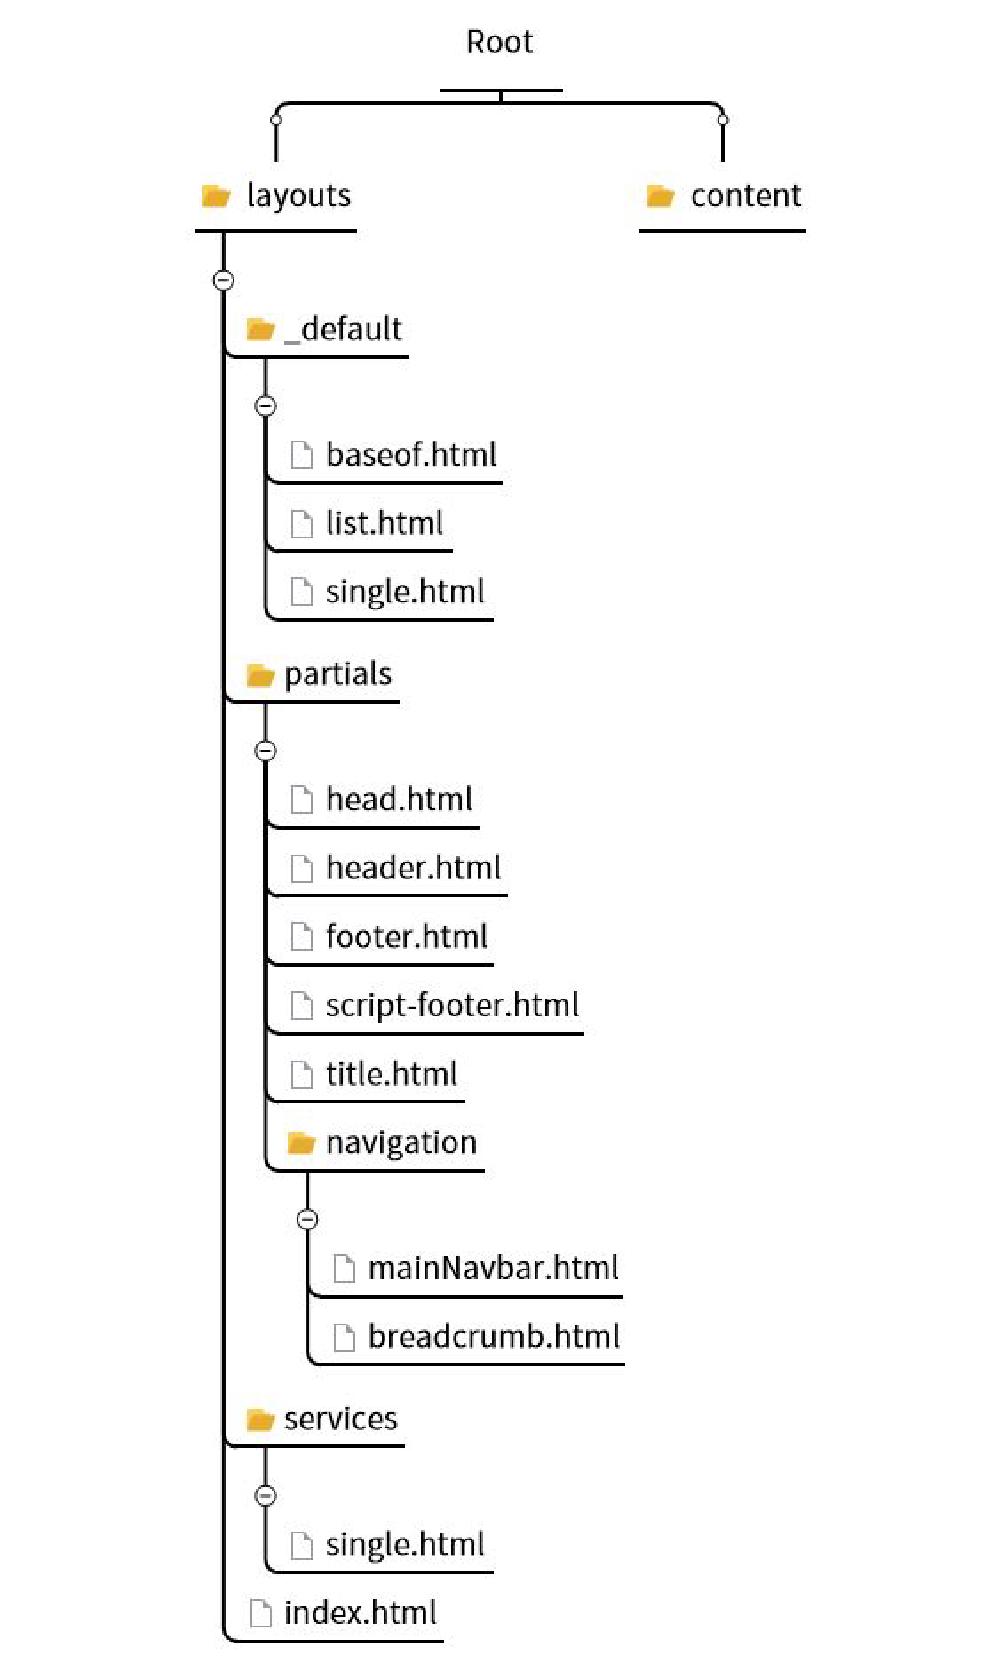
This is our Hugo folder structure that will be used as a reference

Baseof
I’ve added <header>, <main> and <footer> semantic tags in baseof.html. In Hugo baseof.html is the shell template from which all pages are rendered
<!DOCTYPE html>
<html lang="{{ .Language.Lang }}" class="no-js">
  <html>
    <head>
      {{- partial "head.html" . -}}
      {{- partial "json-ld.html" . -}}
      {{- block "JSON-LD" . }}{{- end }}
    </head>

    <body>
      <header>{{- partial "header.html" . -}}</header>
      <main>{{- block "main" . }}{{- end }}</main>
      <footer>{{- partial "footer.html" . -}}</footer>
      {{ partial "script-footer" . }}
    </body>
  </html>
</html>
Navigation
In the navigation partial navigation\mainNavbar.html we use the <nav> semantic tag:
<nav
  class="navbar navbar-expand-lg navbar-light fixed-top bg-dark pb-3 varelatxt"
>
  <div class="container-fluid px-3">
    <a class="navbar-brand " href="{{ .Site.BaseURL }}"
      ><img src="/img/bullaki-logo.svg" alt="Bootstrap" class="bi-5"
    /></a>
    <button
      class="navbar-toggler"
      type="button"
      data-bs-toggle="collapse"
      data-bs-target="#navbarScroll"
      aria-controls="navbarScroll"
      aria-expanded="false"
      aria-label="Toggle navigation"
    >
      <span class="navbar-toggler-icon"></span>
    </button>
    <!--  -->
Article and Section
In HTML5, both the <article> and <section> elements are used to define distinct sections of content on a web page. The main difference between the two elements is that an <article> element typically represents a self-contained piece of content, such as a blog post or news story, while a <section> element is used to define a distinct section of content within a larger context, such as a chapter or group of related content.
It is possible to nest an <article> element within a <section> element, or vice versa, depending on the desired structure and organization of the content. However, it is important to consider the semantics of the elements when deciding how to nest them.
When an <article> is nested within a <section>, it is typically used to represent a self-contained piece of content that is related to the main content of the section.
On the other hand, when a <section> is nested within an <article>, it is typically used to organize the content of the article into logical sections.
In summary, you can nest <article> in <section> or vice versa, depending on the desired structure and organization of the content, but it is important to consider the semantics of the elements and ensure the correct nesting to improve accessibility and SEO.
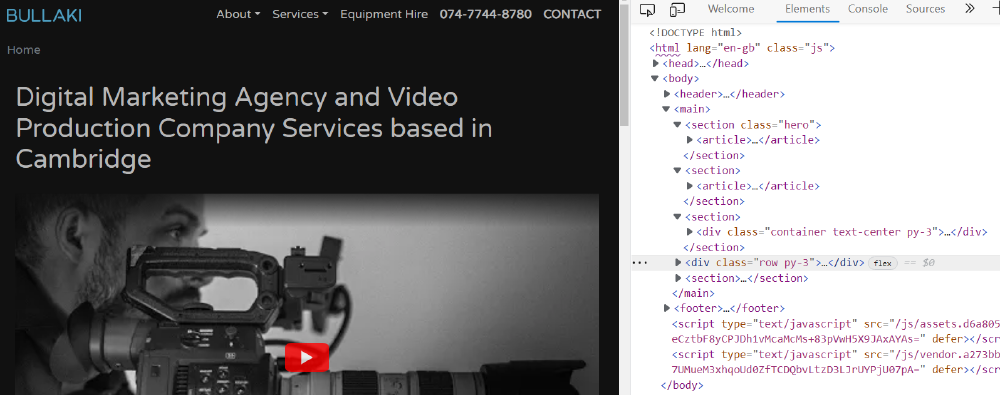
Now we can take a look at <index.html> under layouts. This is used for the homepage. As you can see here we’ve structured the content with <section>, <article>, <header>. Because each article is self-contained I’ve embedded article inside section.
{{ define "main" }}
  {{/* {{ .Site.Title }} */}}

  <section class="hero">
    <article>
      <div class="container">
        <div class="row py-3">
          <div class="col mx-auto">
            <header>
              <h1>{{ .Params.heading }}</h1>
            </header>
          </div>
        </div>

        <div class="row">
          <div class="col mx-auto">
            <div class="ratio ratio-16x9">{{ partial "show-video" . }}</div>
          </div>
        </div>

        <div class="row pt-3">
          <div class="col-lg-8 mx-auto">
            {{- partial "buttons/getFreeQuoteButton.html" . -}}
          </div>
        </div>

        <div class="row py-3">
          <div class="col mx-auto">
            <header>
              <h2 class="text-left">{{ .Params.description }}</h2>
            </header>
            <p>{{ .Content }}</p>
          </div>
        </div>
      </div>
    </article>
  </section>
  <!-- LIST OF COMPANIES -->
  <section>
    <article>
      <div class="bg-stripe pt-3">
        <h2 class="fs-6 text-center pb-3 fw-bold tx-stripe">TRUSTED BY</h2>
        {{- partial "list-companies" . -}}
      </div>
    </article>
  </section>
  <!-- LIST OF SERVICES -->
  <section>
    <div class="container text-center py-3">
      <div class="row">
        <div class="col">
          <header>
            <h2 class="fs-1 pb-3">{{- .Params.cardsTitle -}}</h2>
          </header>
        </div>
      </div>
      <div class="row g-3">
        <!-- Sort methods: https://gohugo.io/templates/lists/#order-content-->
        {{ range $elem_index, $elem_val := (where site.RegularPages "Section" "services").ByWeight }}
          <div class="col-md-12 col-lg-4">
            <article class="h-100">
              <div class="card opacity-75-hover h-100">
                <div class="card-body d-flex flex-column">
                  <div class="fs-1 text-primary me-2 my-2">
                    {{ with .Params.icon }}
                      {{- partial "svg-icon" . -}}
                    {{ end }}
                  </div>
                  <header>
                    <h3>
                      <a href="{{ .RelPermalink }}" class="h3 stretched-link"
                        >{{ .Title }}</a
                      >
                    </h3>
                  </header>
                  <p class="card-text text-center">{{ .Summary }}</p>
                  {{/* <a href="#" class="card-link">Card link</a> */}}
                </div>
              </div>
            </article>
          </div>
        {{ end }}
      </div>
    </div>
  </section>

  <div class="row py-3">
    <div class="col-lg-8 mx-auto">
      {{- partial "buttons/getFreeQuoteButton.html" . -}}
    </div>
  </div>

  <!-- REVIEWS -->
  <section>
    <article>
    <div class="py-3 bg-stripe">
      <h2 class="fs-6 text-center pb-3 fw-bold tx-stripe">TESTIMONIALS</h2>
      {{ with .GetPage "/about/reviews" }}

        {{- partial "reviews" . -}}
      {{ end }}
    </article>
    </div>
  </section>
{{ end }}
It’s always a good idea to inspect with the browser (make sure you are running the Hugo server in render production mode):

We can use the same approach for other types of pages of course. The concept will be exactly the same.
Other pages
The service pages in this website, for example video productions, use the /services/single.html template:
{{ define "main" }}
  {{ $temp := print "/categories/" .Params.correspondingCat }}
  {{ $t := .Site.GetPage $temp }}

  <section class="main">
    <article>
      <div class="container">
        <div class="row py-5">
          <h1>{{- partial "title.html" . -}}</h1>
          {{- partial "show-video" . -}}

        </div>

        <div class="row pb-5 g-5">
          <div class="col-lg-6 order-lg-first">
            <div class="">
              {{ .Content | markdownify }}
            </div>
            {{ .Scratch.Set "button_text" "GET A FREE QUOTE" }}
            {{ .Scratch.Set "button_URL" "/contact" }}
            {{- partial "buttons/genericButton.html" . -}}
          </div>
          <div class="col">
            {{ if eq .Title "Equipment Rental" }}
              {{ partial "list-of-equipment" . }}
              {{/* {{ else if or (eq .Title "Illustrations") (eq .Title "Photography") }}
              */}}
            {{ else if (eq .Title "Photography") }}
              <header><h2>Our {{ .Title }}</h2></header>
              {{ $path1 := .RelPermalink }}
              {{ range .Resources.ByType "image" }}
                <div class="py-3">
                  {{ partial "image" (dict "src" . "page" $ "alt" (path.BaseName .) "format" "equipment") }}
                </div>
              {{ end }}
            {{ else if (eq .Title "Illustrations") }}
              <header><h2>Our {{ .Title }}</h2></header>
              {{ .Scratch.Set "project_type" "graphics" }}
              {{- partial "show-list-of-videos-services" . -}}
            {{ else if (eq .Title "Web Development") }}
              <header><h2>Our {{ .Title }}</h2></header>
              {{ .Scratch.Set "project_type" "web" }}
              {{- partial "show-list-of-videos-services" . -}}
            {{ else }}
              <header><h2>Our {{ .Title }}</h2></header>
              {{ .Scratch.Set "project_type" "videos" }}
              {{- partial "show-list-of-videos-services" . -}}
            {{ end }}
          </div>
        </div>
      </div>
    </article>
  </section>
{{ end }}
For the page title I’m using a title.html partial, which uses the <header> semantic tag inside it:
<header>
  <h1>{{ .Title }}</h1>
  {{ with .Params.subtitle }}
    <h2 class="fst-italic fs-3 text-muted">{{ . }}</h2>
  {{ end }}
</header>
Heading tags
Heading tags (also known as “header tags” or “H tags”) are used in HTML to define the structure and hierarchy of the content on a web page. The most commonly used heading tags in HTML5 are H1 to H6, with H1 being the highest level heading and H6 being the lowest level heading.
When it comes to SEO, it’s important to use heading tags correctly to indicate the structure and hierarchy of the content on your page. This can help search engines understand the content of your page and the relative importance of different sections, which can help to improve the visibility of your page in search results.
Here are some best practices for using heading tags for SEO purposes:
- Use only one H1 tag per page: The H1 tag should be used to indicate the main heading of the page, and there should be only one H1 tag per page. This should be the first thing that a user sees and should reflect the main topic of the page.
- Use headings in a logical order: Use headings in a logical order, starting with H1 and working down to H6 as needed. This will help search engines understand the structure of your content and the relationship between different sections.
- Use headings to break up long-form content: Use headings to break up long-form content into manageable chunks. This will help users to quickly scan and understand the content of your page and also help search engines to understand the structure of your content.
- Use keywords in headings: Use keywords in your headings that are relevant to the content of the page. This will help search engines understand the topic of your page and improve the visibility of your page in search results.
- Avoid keyword stuffing: While it’s important to use keywords in your headings, it’s also important to avoid keyword stuffing. This means using an excessive number of keywords in an attempt to manipulate search engine rankings. This can have a negative impact on your SEO. By using heading tags correctly, you can help search engines understand the structure and hierarchy of your content, which can improve the visibility of your page in search results.
You can find more information on the Google SEO Starter Guide
Useful Plugins for SEO optimization in Visual Studio Code
We you are writing articles you might find useful a Visual Studio code plugin called Front Matter. This is interesting as it does provide an automatically generated SEO status. This would throw warnings if for example you exceed a certain length for the title (60 characters), description, and article length.